Elegant Rose - Working In Background

Powered by Blogger.

Archive for August 2011

Spongy and Flakie.....


posted by Sara ♥

30 comments

Does that sound kinda gross?! Well actually its pretty awesome! =P


So er what the heck am I going on about? Keep scrolling to find out =))))


I painted my nails in OPI's Siberian Nights which is such a gorgeous deep plum colour with no shimmer. In real life it's way easier to tell that it's purple, these photos make it look very black, but its not!
Its so vampy and dark, I love it! 


After a while I got bored and decided to crack out my cosmetic sponge and used it to apply Nubar's 2010 in a layered, gradient effect =]


Isn't that such a crazy awesome effect?! The flakies change colour constantly from green to gold to coppery orange. 
This polish combo reminds me of autumn leaves =]


And now for the fun of it, here's a gif I created =))))

make a gif


So peeps, what to you think of this nail design? Like it? Wanna try it out yourselves? 


♥♥♥

Reader Request - Neon Zebra Nails - TUTORIAL =]


posted by Sara ♥

15 comments

Hey hey!


I was requested to do a step-by-step tutorial for these neon zebra design nails I showed you all a while ago, so here it is! =]


Enjoy!


So here's what you need. I know I'm holding onto a Colour Club bottle in the picture, but I actually used these ebay striper polishes for the mani. Any six neon colours of your choice will do just great =] You'l  also need a black stamping polish, mine is Colour Clubs Where's the Soiree. Also, you will need a cosmetic sponge to apply the polish with.


Here is the zebra image I used for the stamping design. So you'l need your stamping plates and a stamper and scraper too of course.


*Please ignore that weird pink splodge in the middle of this false nail! I don't own any proper falsies and the only one I could find was this which is pink and glittery lol! So I just used that for this tutorial, hope you don't mind? =]*


1. Paint your nails with any white polish. (Er, why I haven't included this in the picture of polishes above I'l never know!) I used two coats. 


2. Take your cosmetic sponge and rip up into six pieces. Use each piece for a different colour. Then take a polish, I chose the blue one first, and apply a bit like how I have done so in the picture, onto the sponge.


3. Dab the sponge with the blue polish lightly onto your nail like so.


4. Then repeat the process with your next chosen colour. I used the orange and applied it as shown.


5. Again, repeat the process and use a different colour. I used the pink this time and applied it as shown.


6. Use a different colour again and repeat. I chose the green and sponged it on like shown.


7. Repeat again with another colour. I used purple and added it to the nail as seen.


8. Use your last colour and repeat the sponging process. My last colour was yellow and I applied it as shown.


9. Now go back to the first colour you used and apply that to fill up any remaining gaps. Mine was blue and I added it to the nail as seen. Also apply a topcoat to get rid of the matte, rough texture the sponging method left behind.


*Oh wow i'm such a failure. =S Lol it's super difficult to stamp on a fake nail!! Basically this nail was really big and the konad design didn't fit on it so I er tried to freehand the rest of the zebra stripes.... God what the heck happened in the left hand bottom corner??!!!! =/ Ugh. Well at least you get the idea right??*


10. Now stamp! Then apply a topcoat and you shall be done! =]


Phew. That was my first ever tutorial!
I hope you guys enjoyed it? And I hope you'l also give it a go =] If you do, don't forget to let me know how you get on!


♥♥♥

Outfit Inspired Nails =]


posted by Sara ♥

17 comments

Today's nail design was inspired by an Indian style dress I own. Here's a close-up picture of the patterns and colours of cloth the dress is made from:

  
So pretty right? To recreate the design I went in search of polishes which match the colours of the dress. =]
I settled upon using a black in the form of Colour Club's Where's the Soiree, an antique gold in the form of MEMEME's Pewter and the most perfectly matching teal in the form of Wet and Wild's Caribbean Frost =]

To create the nail design, the first thing I did was paint my nails in Caribbean Frost:


Caribbean Frost is such an incredible metallic teal colour which shines like crazy! Sooo beautiful =] I used two coats of polish here.


Next to create the patterns within the dress I used thin strips of tape and Colour Club's Where's the Soiree to make vertical lines down my nails. Over the top of this I stamped on a pattern from Bundle Monster plate BM 20 using MEMEME's Pewter.


I love this look! It also looks quite oriental, with the fan type pattern =]


Here's how they look against the actual dress:


Yay =] Lol I really like how these turned out and I can't wait to wear my dress tonight =] I didn't mention before but I'm going to a formal evening dinner type thing tonight lol and this is what i'l be wearing there =]


So what do you think of this design? Have you guys ever recreated an outfit or something else on your nails??


♥♥♥

Neon, Bright and Crazy!!!


posted by Sara ♥

18 comments

*Update on blog post stealing issue: I contacted Blogger and reported the site that was stealing my work, and recently I got a reply from them letting me know that they had deleted some of the pages from the site which had my stuff on. However, they only deleted like 4 pages which is literally nothing since there must be over a 100 pages on that site with my work all over them! So i'm still fighting, trying to get Blogger to delete the entire site, but they have yet to get back to me for that, so I guess we'l have to wait and see. At least I know that they'r listening and working on helping me out. =] Once again I'd like to say a huge thank you to all you lovelies for your support. (Hugs) =]*

Hello everyone =)

I'v been in a weird and crazy mood lately so to reflect that here's the mani design I came up with =]
I was inspired by the absolutely amazing Youtube nail artist, Robin Moses =] She used pigments but I sponged on ordinary polishes for this.


Groovy huh? =P
My stamping went a little weird but oh well... I still like it =]


Looks a lot better from far =]


What do you think of this uber bright, eye popping design?? Would you be brave enough to try it out for yourselves??


Oh and if you would like a tutorial on how I did this, let me know please =] 


♥♥♥

Edgy Knuckle Duster Clutch Bag


posted by Sara ♥

12 comments

Halloooo!


In yesterday's post I gave you all a sneak peek at my new bag, and promised I would show you it in its full glory today =] 

So here we go!


I'v always been in love with Alexander McQueen's knuckle duster clutches, and I always thought I'd be drooling over pictures of them.... not an actual one held in my hands....
So okay, this one isn't the real deal but still looks a heck of a lot like it! And I can actually drool over it whilst holding it.... =P

The real bags sell for around £1,500 each.... so er I don't think I'l be able to afford one of them anytime soon lol!
So when I landed upon this beauty, priced at an incredible £21.85 (plus p&p) I snatched it up as fast as I could! (not that I needed to... Amazon has loads in stock =P)


How kick-a** does it look???!!! 

Gosh I LOVE it! =)

Okies so that's it for today peeps, let me know what you think of it =] Is it too fierce or totally perfect?? 

♥♥♥


Art Deco Nails =]


posted by Sara ♥

15 comments

Hey everyone!

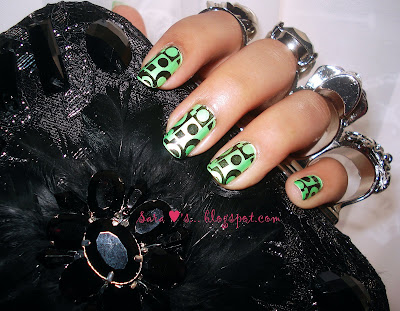
After receiving all of that awesome nail mail recently I was having a hard time trying to choose which polish to use first! But eventually, after a lot of deliberation =P I ended up choosing Jesse's Girl Midori to be the star of this mani =]


Midori is such an amazing super bright metallic lime green polish (phew, that was a mouthful! =P) which is seriously waayyyy brighter in real life!
Being metallic it's prone to brush strokes, so you have to be quite careful when applying it. I used two coats here but ended up applying three on my index and middle fingers since I messed up and got huge brush stroke marks!


Next I stamped over it in Colour Clubs Where's the Soiree using a pretty funky image from my giant stamping plate =] The design reminds me of Art Deco style decoration pieces!


I love it! =] It's so attention seeking lol!
The pattern also managed to hide a lot of the brush strokes and made it more erm, even looking =]


Aaagh!
Lol I took this pic to show how cool it looks from afar =] I think it looks better from far than close up because some of my stamping didn't come out too well.... =/


Bonus pics of my new bag =] These pictures show the green in this polish a lot better.
I'l be showing you the bag properly tomorrow =]


Okies so that's all from me for now. Hope you liked this mani??


♥♥♥

09 10